Are you having trouble editing files from Adobe's Lightroom in Photoshop?

Normally a seamless experience, right clicking on an image and choosing Edit In > Edit in Adobe Photoshop... is easy, or quicker using the CTRL+E shortcut.

****This issue has reappeared in September 2024, see this post for how to fix the problem: https://panoramicireland.com/photography-photoshop-post-processing/error-adobe-photoshop-lightroom-version-open-warning-having-issues-connecting-how-to-temporarily-fix-cliffs-of-moher-image ****

**Final Update: September 2023 - this issue has been fixed with the release of Adobe Photoshop 2024 which includes the Generative Fill commands previously only available in Photoshop Beta**

**Update Again: 17/08/2023 part Two - This bug has been addressed and partially fixed with Adobe Lightroom Classic v 12.5 that should be available now. The context menu will show "Edit in Adobe Photoshop 2024..." but now it actually does open as normal. So it's time to update Photoshop (Beta) to v 25.0 and you will have almost normal operation and the return of Generative Fill** 

Please consider a small donation to help with the costs of running this website, every little helps and goes towards creating articles on Photography, Photoshop and Ireland. Thank you.

In fact it only works to open Photoshop (Beta), if Photoshop is open it will default to the old behaviour of taking minutes to respond, tell you it can't be opened and then create a .tif file.

So if you have Photoshop open it will not work, only if both Photoshop and Photoshop Beta are closed, or if only Photoshop Beta is open, then it will work.

To say Adobe are making a right mess of this Photoshop Beta would be an understatement.

I was editing some images from Dublin, and this one of city's fine City Hall, it opened in 1779 as the Royal Exchange but functioning since 1851 the city hall. Unfortunately I ran into problems with editing the image.

If, like countless others, you are having problems with Photoshop hanging then Lightroom showing an error stating "The file could not be edited because Adobe Photoshop 2024 could not be launched.", well you are far from alone.

 

Adobe Lightroom - The file could not be edited because Adobe Photoshop 2024 could not be launched.


The solution in most cases is simple, this is a known and acknowledged bug by Adobe. 

Likely it is because you have also installed Adobe Photoshop (Beta), the newest version has an incorrect reference to Adobe Photoshop 2024 when in fact you have Adobe Photoshop 2023 installed.

This fix will work even if you are using Photoshop for external editing.

For me, on Windows 10, the error started after updating Photoshop Beta to the latest version (25.0).

CTRL+E in Lightroom, even with the official Photoshop app already open, caused the program to hang for several minutes after which Lightroom showed that error about Photoshop 2024.
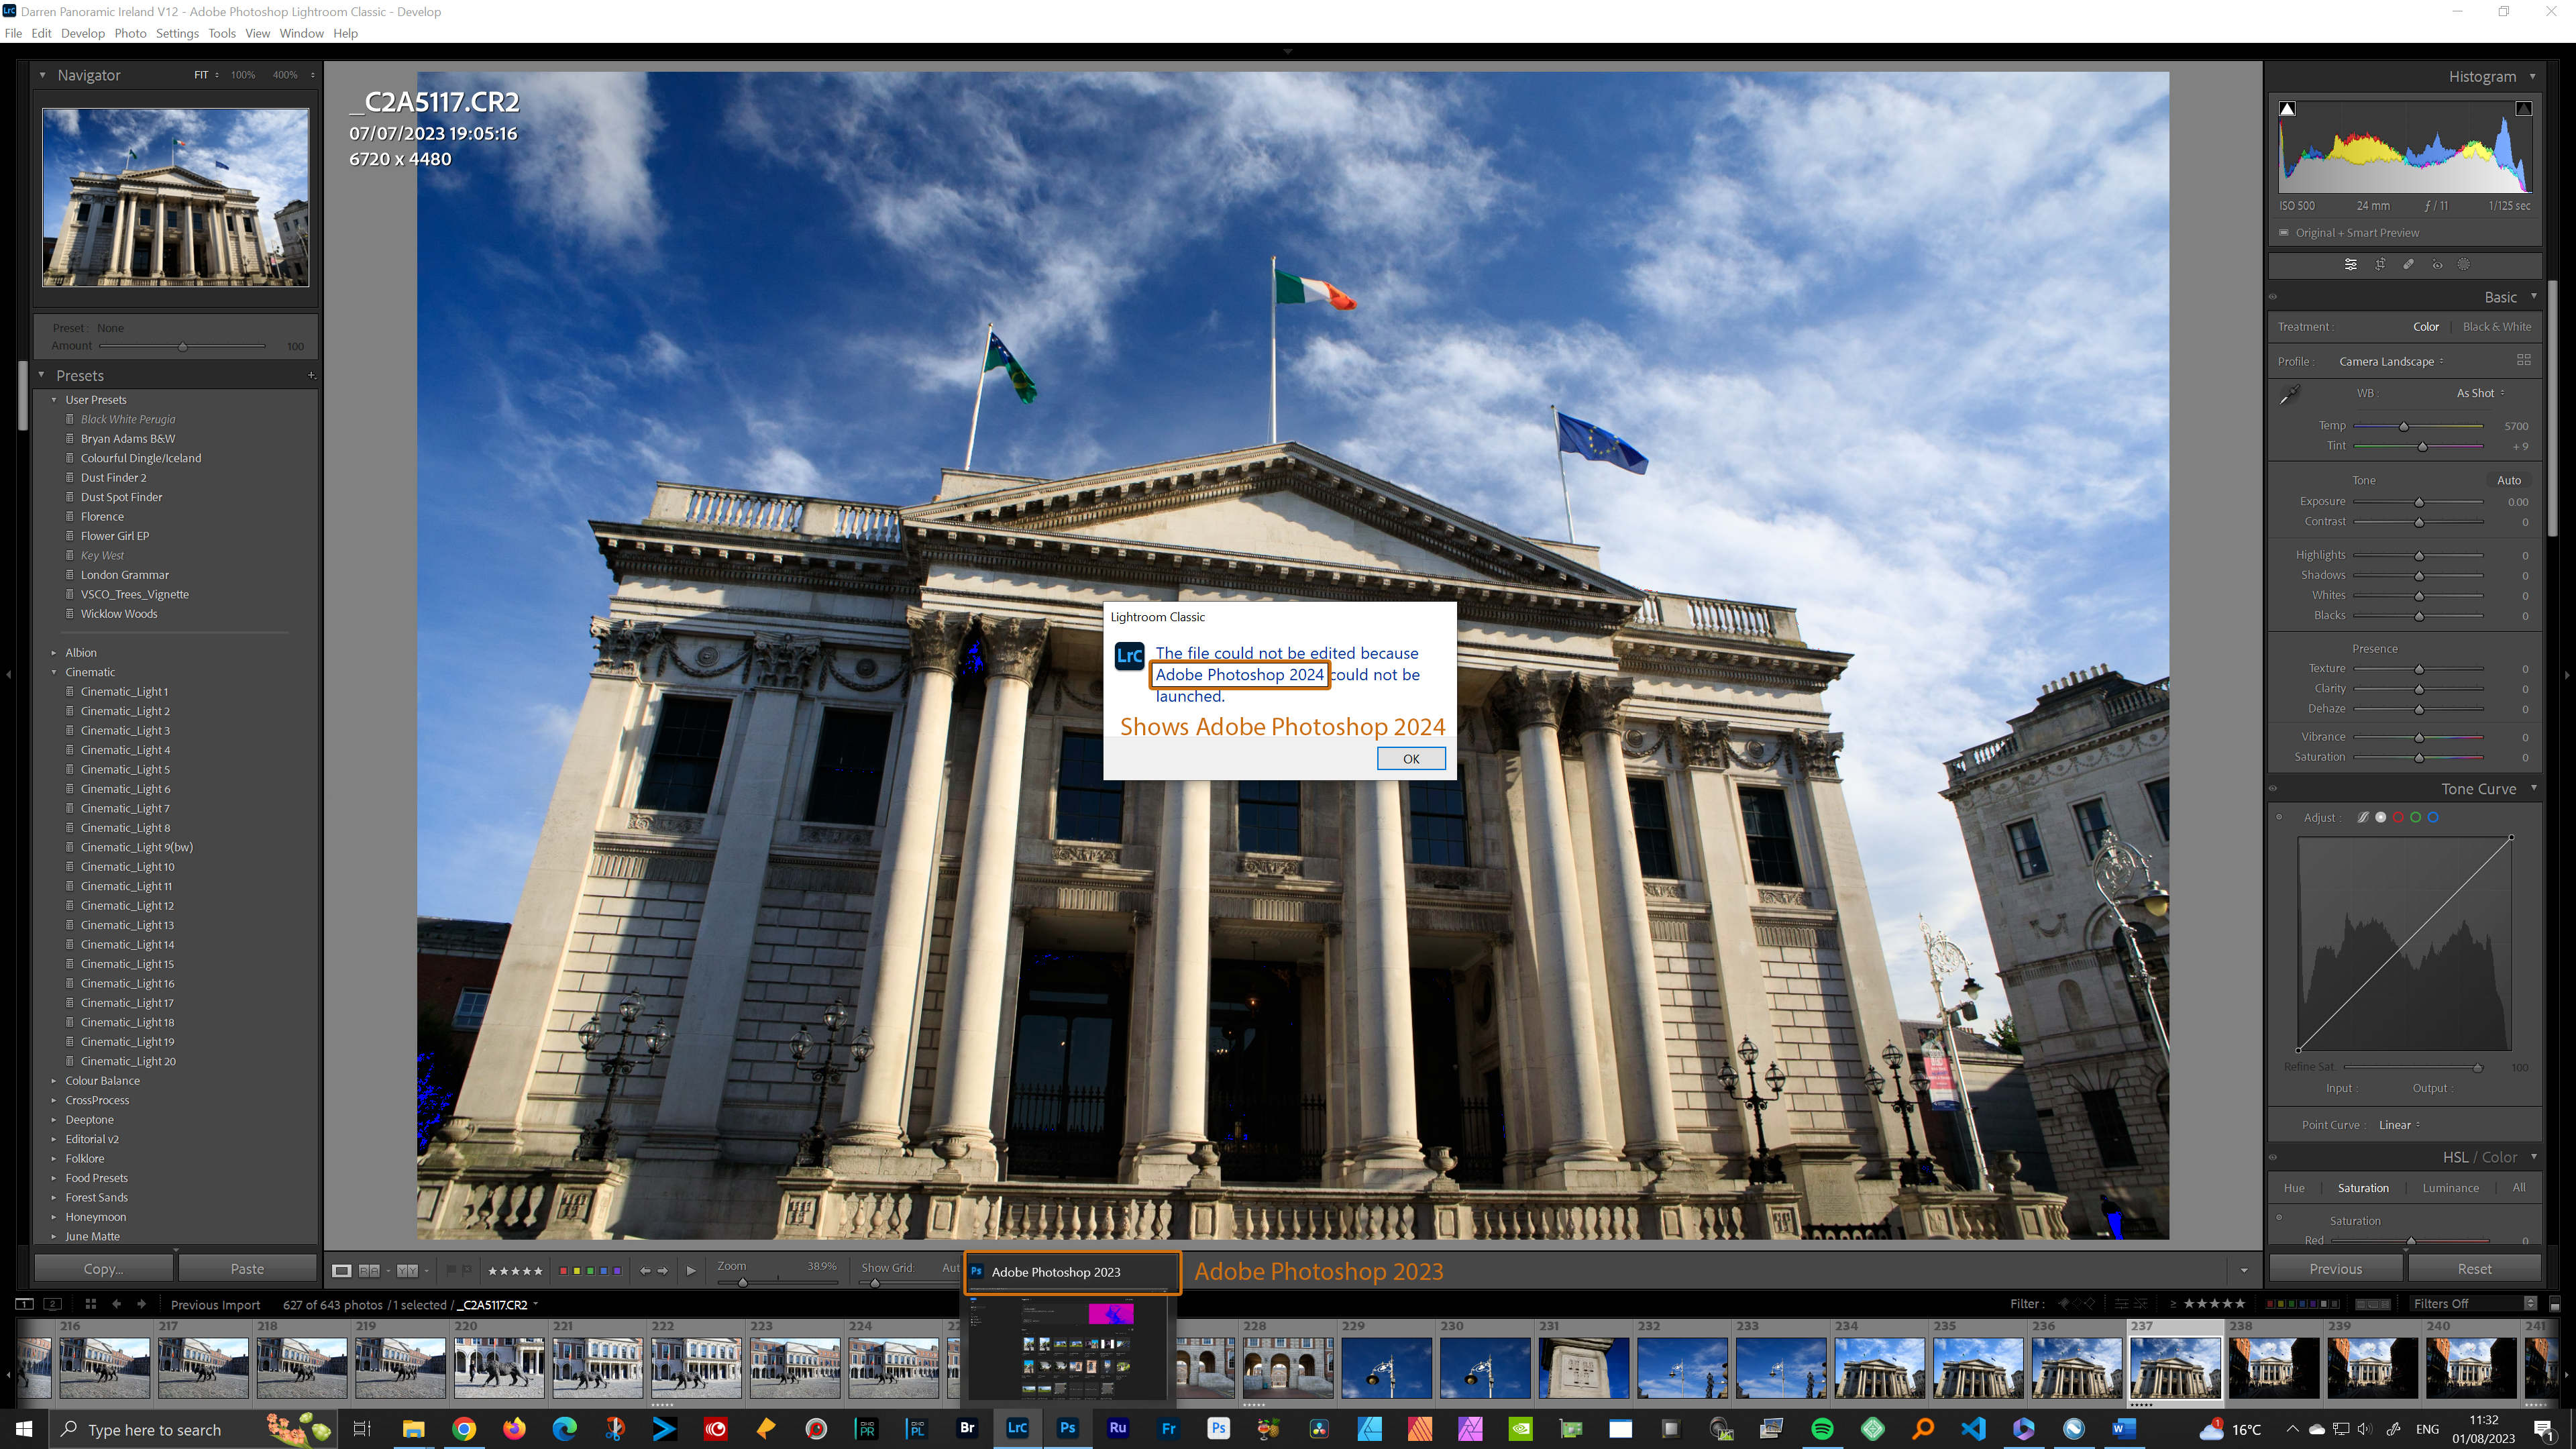
 

Adobe Lightroom - The file could not be edited because Adobe Photoshop 2024 could not be launched.


After clicking OK, Photoshop did then open the image but it also instantly created a .tif version in the Lightroom filmstrip (normally when editing in Photoshop this tif wouldn't be created until you saved the file).

To fix, open Creative Cloud Desktop then go to Apps, scroll down to Beta apps and click on the three dots beside open for Photoshop (Beta)

Choose Other versions then go to the previous version, in this case I reinstalled 24.7.

 

Install version 24.7 of Photoshop (Beta) to fix Lightroom error


You don't need to uninstall Photoshop (Beta) 25.0 as installing 24.7 here will uninstall the offending most recent, offending version.

Afterwards, Lightroom correctly shows the external editing in Photoshop to be Adobe Photoshop 2023 - Edit > Preferences... > External Editing > Photoshop Version:
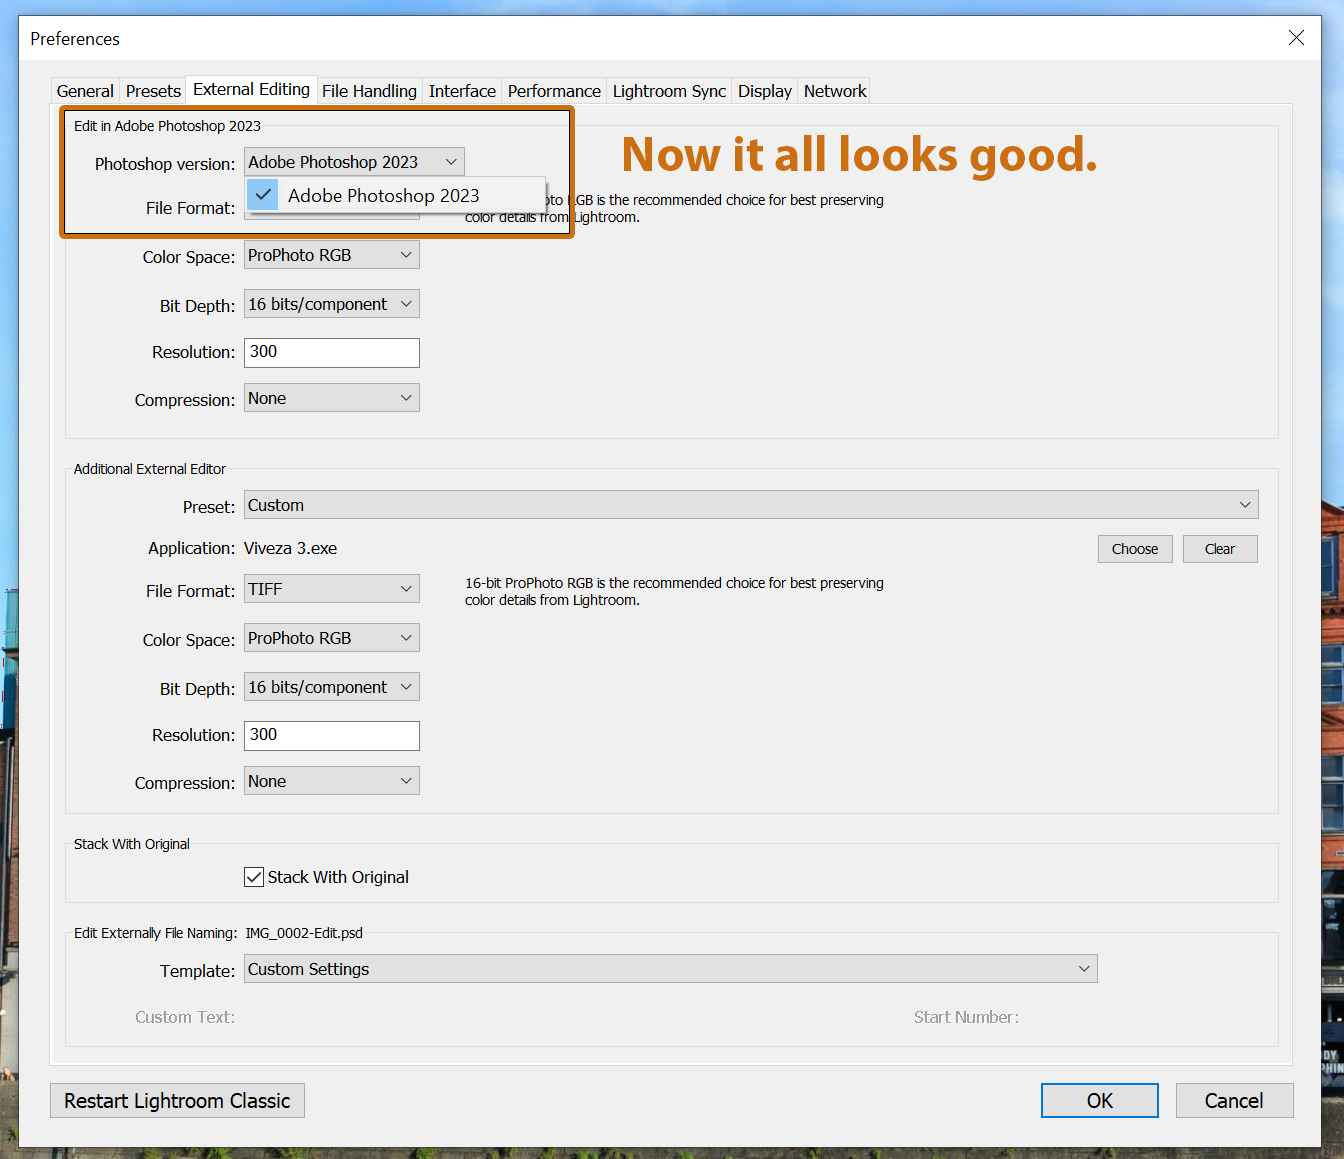
 

Adobe Lightroom External Editor now shows Adobe Photoshop 2023


Normality resumes, with Edit in Photoshop 2023 bringing the file instantly into Photoshop and loading it as a .CR2 file and only saving it when choosing to save.

I have read elsewhere of people uninstalling Lightroom and Photoshop but the simple fix is to try this first.

It's a big problem, and just one of a number recently introduced since Adobe launched Photoshop (Beta), so if you don't want to attempt this fix an update will be released sooner rather than later.


I don't use my mobile phone for serious photography but I do often take personal images, videos and quick overviews of landscape scenes when making long exposures for instance.

But I know that so many do use mobiles for photography, often it's their main or only camera, but the file formats being used now can pose problems for some computers and programs.

One in particular is the HEIC or HEIF format.

HEIC, or High Efficiency Image Container, is a relatively new image file format that was developed by the Moving Picture Experts Group (MPEG). It's also known as HEIF (High Efficiency Image Format), and HEIC is the file extension for image files stored in HEIF.

HEIC was introduced in 2015 by the MPEG. It's a part of MPEG-H Part 12 (ISO/IEC 23008-12) and was largely popularised by Apple, who started using it as the default format for photos on iOS 11 and macOS High Sierra in 2017, replacing the JPEG format.


Advantages of HEIC Over JPEG:

  1.  Size Efficiency: The most significant advantage of HEIC over JPG is its superior compression. HEIC images are typically half the file size of JPG images at the same quality level. This means you can store twice as many photos in the same amount of space.
  2.  Support for More Features: Unlike JPEG, the HEIC format supports 16-bit color depth, as compared to JPEG's 8-bit. This results in a wider range of colors and greater color accuracy. HEIC also supports transparency like PNGs and can store image sequences, similar to GIFs. Furthermore, it can store additional data like burst photos, live photos, or image editing settings within the same file.
  3.  Lossless Compression: HEIC also supports lossless image compression, meaning no image quality is lost when the image is compressed.


Disadvantages of HEIC Over JPEG:

  1.  Compatibility: Not all operating systems, applications, or devices support HEIC natively. For example, older versions of Windows or Android do not support it without additional software. However, newer versions of these platforms and many modern web browsers have begun to include native support.
  2.  Conversion Issues: Because of the lack of universal support, you may frequently need to convert HEIC images to JPEGs or other formats, which can be an additional hassle.
  3.  Processing Power: The better compression algorithms in HEIC require more processing power to encode and decode. This might result in slower performance on older hardware.


It's worth noting that, despite its disadvantages, the adoption of the HEIC format is growing due to its advantages, particularly in the era of high-resolution cameras and limited storage space on devices.


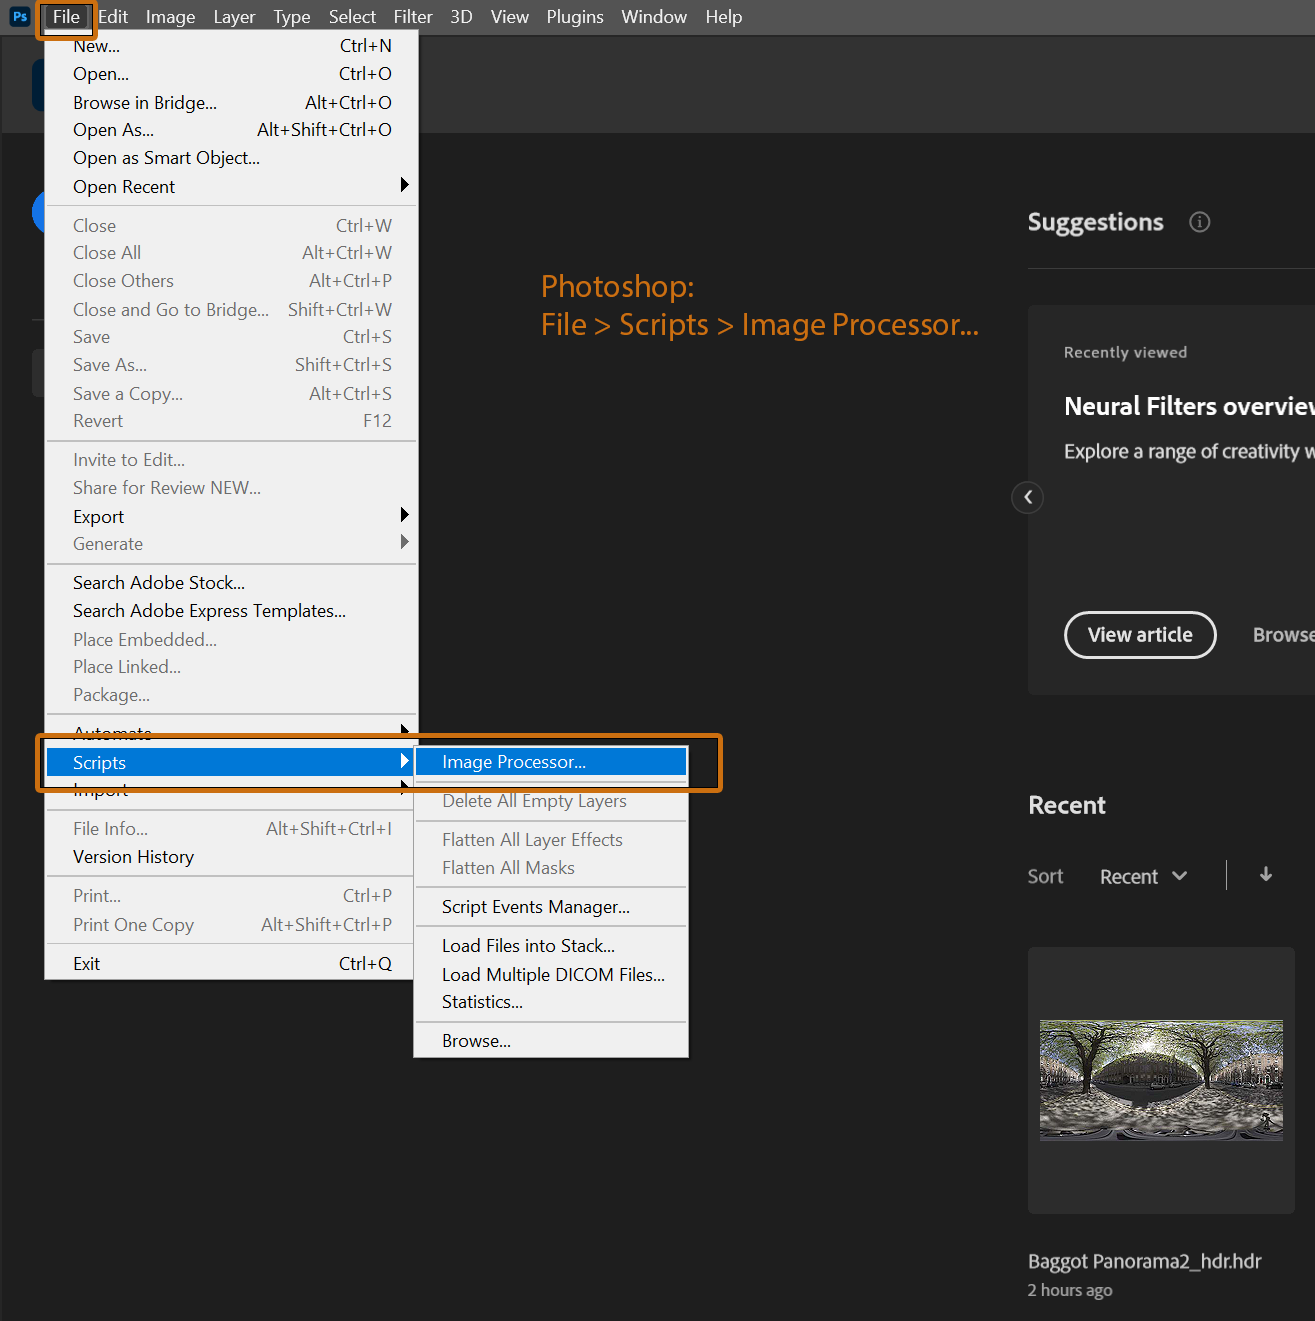
So how easy it is to make use of the images depends on your system, but using Photoshop it is easy to process and convert HEIC to JPG, TIFF or PSD; here's how using Image Processor in Adobe Photoshop:


Adobe Photoshop - Image Processor


  1. Open Photoshop 2023
  2. Click on File > Scripts > Image Processor

A window will open with lots of options, for this we simply:


Adobe Photoshop - Image Processor Options


  1. Choose the location of your source images, it could be files already open in Photoshop or it could be a folder, here my source images are in Q:\Photos-001 (2) and I don't want to include any sub-folders this time
  2. Choose the destination of your processed images, it could be the same location, like I have chosen or select another location on a different drive for instance
  3. Choose the output file types, here I have chosen both JPEG and TIFF but you can choose one or both as well as adding PSD output. There are some options here, JPEG Quality, Convert Profile to sRGB etc. I didn't want to resize to specific dimensions
  4. Here you can choose to run an action from your default and saved Photoshop actions, you can also add copyright information and add the ICC profile.
  5. Hit Run at the top right

That's it, Photoshop will run, process the images and create the folders such as JPEG / TIFF / PSD with those files added.


Adobe Photoshop - Image Processor Folders


You now have your HEIC images converted to other formats.

Join me in 2023, 2024 and beyond to learn how to make better images in Ireland from photographing to post-processing using Photoshop.


Sometimes when working with images in Adobe Lightroom Classic, it is preferable to group similar images together into a stack so that all of the images are on top of each other with one on top.

In this case, I have been working on images taken in an exposure bracket or maybe if you had a sequence for focus bracketing.

Here there are five images taken with different exposures to give a final image with a wider dynamic range, or HDR and after processing these to create the HDR image I don't need to see the five source images.

{}

Usually when processing in this way it is possible to have Lightroom group the images into a stack automatically.

But on occasions, either when forgetting to do so, or as in my case Lightroom failed to create the stack automatically, it is possible to add images into a stack manually.

Here are the steps to group images into a stack in Lightroom with Grid view (images below):

  1. Select your images, here I have the five source images and one HDR image so six in total

  2. Right click on the selection

  3. In the context menu choose Stacking, then Group into Stack

  4. That's it, or you can use the CTRL-G shortcut after selecting images

  5. To expand the stack, click on the number badge at the top left

  6. Right click on the number badge to bring up a context menu that offers options to manage the stacks


Grouping images into a stack helps to keep your image library organised and neat. 

Another use case in addition to what I mentioned above would be when shooting bursts, say at an event or wildlife images where you will probably use one image but want to keep the others for future use or a different use. 

And I usually group my timelapse images into a stack as well, who needs a few thousand thumbnails of the same scene cluttering up their view?

So, that's how simple it is to group images into a stack in Adobe Lightroom, to keep your image library better organised just as with my images of the majestic Mourne Mountains in County Down here.


{}


 Find out more about Panoramic Ireland's classes in how to use Adobe Lightroom and Photoshop more effectively by contacting us.


Adobe's Lightroom, known as Lightroom Classic to distinguish it from the cloud-based Lightroom CC, is one of the best image editing programs to be found. Undoubtedly, Lightroom Classic (Not Lightroom CC) is the best image management software by far with no rival to its combined functionality.

Despite this, there is no easy way to find all black and white images in Lightroom Classic, the closest method is to use Smart Collections.

Collections are one of Lightroom Classic's best ways to organise images, Smart Collections automatically find and add images based on criteria you set.

Here I'm going to create a Smart Collection for images that have been marked as Black and White in Lightroom Classic, so all of the images that I have converted to black and white using the program.

Here's how:

  • In the left hand side panel, scroll down to Collections

  • Click on the + to the right

  • In the context menu choose Create Smart Collection...


Create Smart Collection... in Adobe Lightroom Classic


  • Next, name your Smart Collection

  • Choose whether or not to nest the new Smart Collection inside a Collection Set or not

  • Then choose your options, here I have done the following:

    • Match any of the following rules - I will only have one rule here but you could add several

    • Click on Rating to bring up a sub-menu, here I have gone to Develop > Treatment

    • This creates the rule, then you can choose to make more if so desired


Adobe Lightroom Classic - Create Smart Collection, Create Rules


  • Check that your rule is what you want, add another if necessary

  • Click Create

  • That's it, your Smart Collection will now be created and any images in your Lightroom database that match the criteria set will be added to it

 {}

Here we can see that my black and white images number 694, this is not the true number of such images in my catalog it is only a collection of those that have been converted or marked as a black and white in Adobe Lightroom itself.


Adobe Lightroom Classic - Smart Collection - Black and White Images


Black and white images from other programs or scans for instance, will not appear in this Smart Collection unless they were marked as Black & White in the Treatment section of the Basic Panel in the right hand side panel.


Adobe Lightroom Classic - Basic > Treatment > Black and White Treatment > Black and White"/>
Adobe Lightroom Classic - Basic > Treatment > Black and White


So now I can find my black and white images, most of them at least, like this one of crashing waves on Ireland's Wild Atlantic Way in Dingle, Ireland.


Panoramic Ireland - Black and White - Crashing Waves on the Wild Atlantic Way Coast of Dingle, County Kerry, Ireland


There is some software that can find black and white or monochromatic images but not as part of Adobe Lightroom Classic. To keep up to date as you go, it would be best to mark any scanned images or those from other programs with a keyword that you can then attach to the Smart Collection.

To get one-to-one advice on your post-processing workflow, why not take one of my online photography sessions where we can cover any topic from using Lightroom to using filters for long exposure photography. You don't have to be in Ireland, find out more here.


Sometimes, particularly when moving folders between drives, Lightroom will show only the folder with images in the left hand pane without regard to actual folder hierarchy on the drive.

Read on for more on how to keep Lightroom tidy as you like it.

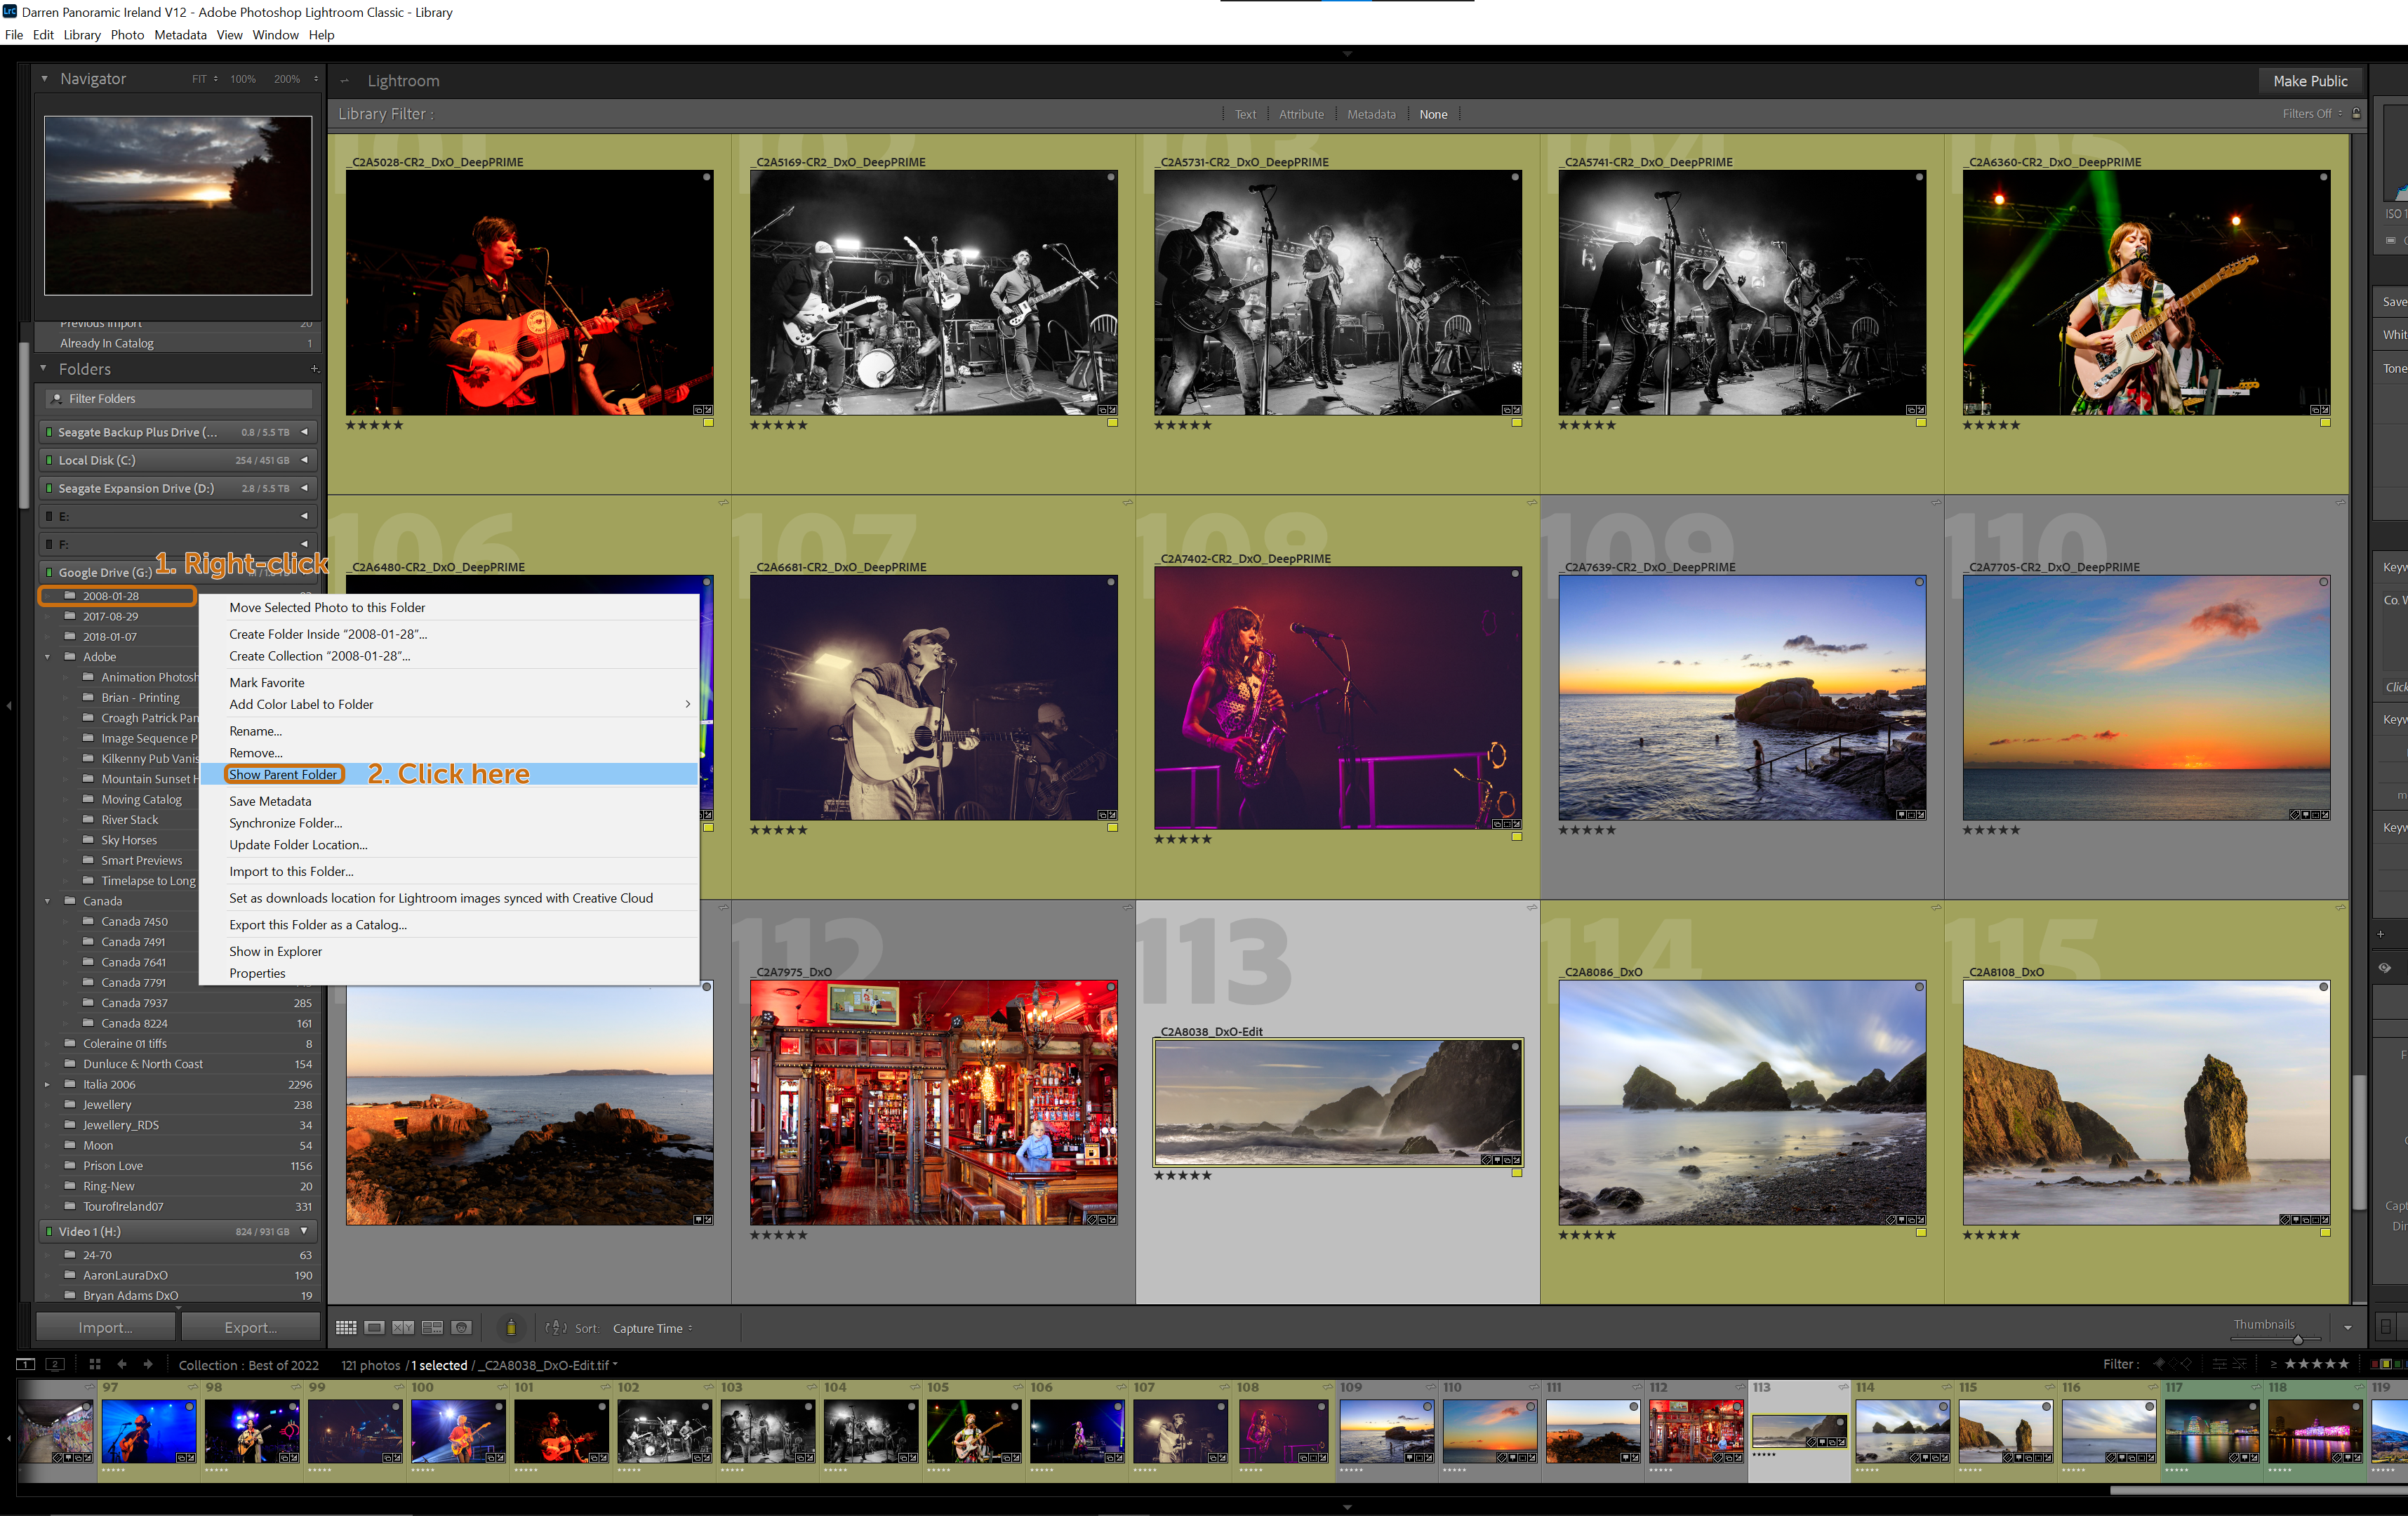
See the image here, the folders 2008-01-28, 2017-08-29 and 2018-01-07 are all located in folders based on year, so 2008, 2017 and 2018 respectively.


Adobe Lightroom Image Management - Show Parent Folder


To show the actual folder structure in Lightroom so that it matches that on the drive, here is what to do:

  1. Right-click on the folder [2008-01-28]

  2. In the context menu that appears, click on Show Parent Folder

  3. That's it, the folder will now show underneath its parent folder in the left hand panel


So, when you add more image folders to the parent folder, here 2008, they will be nested underneath and will therefore be collapsible.

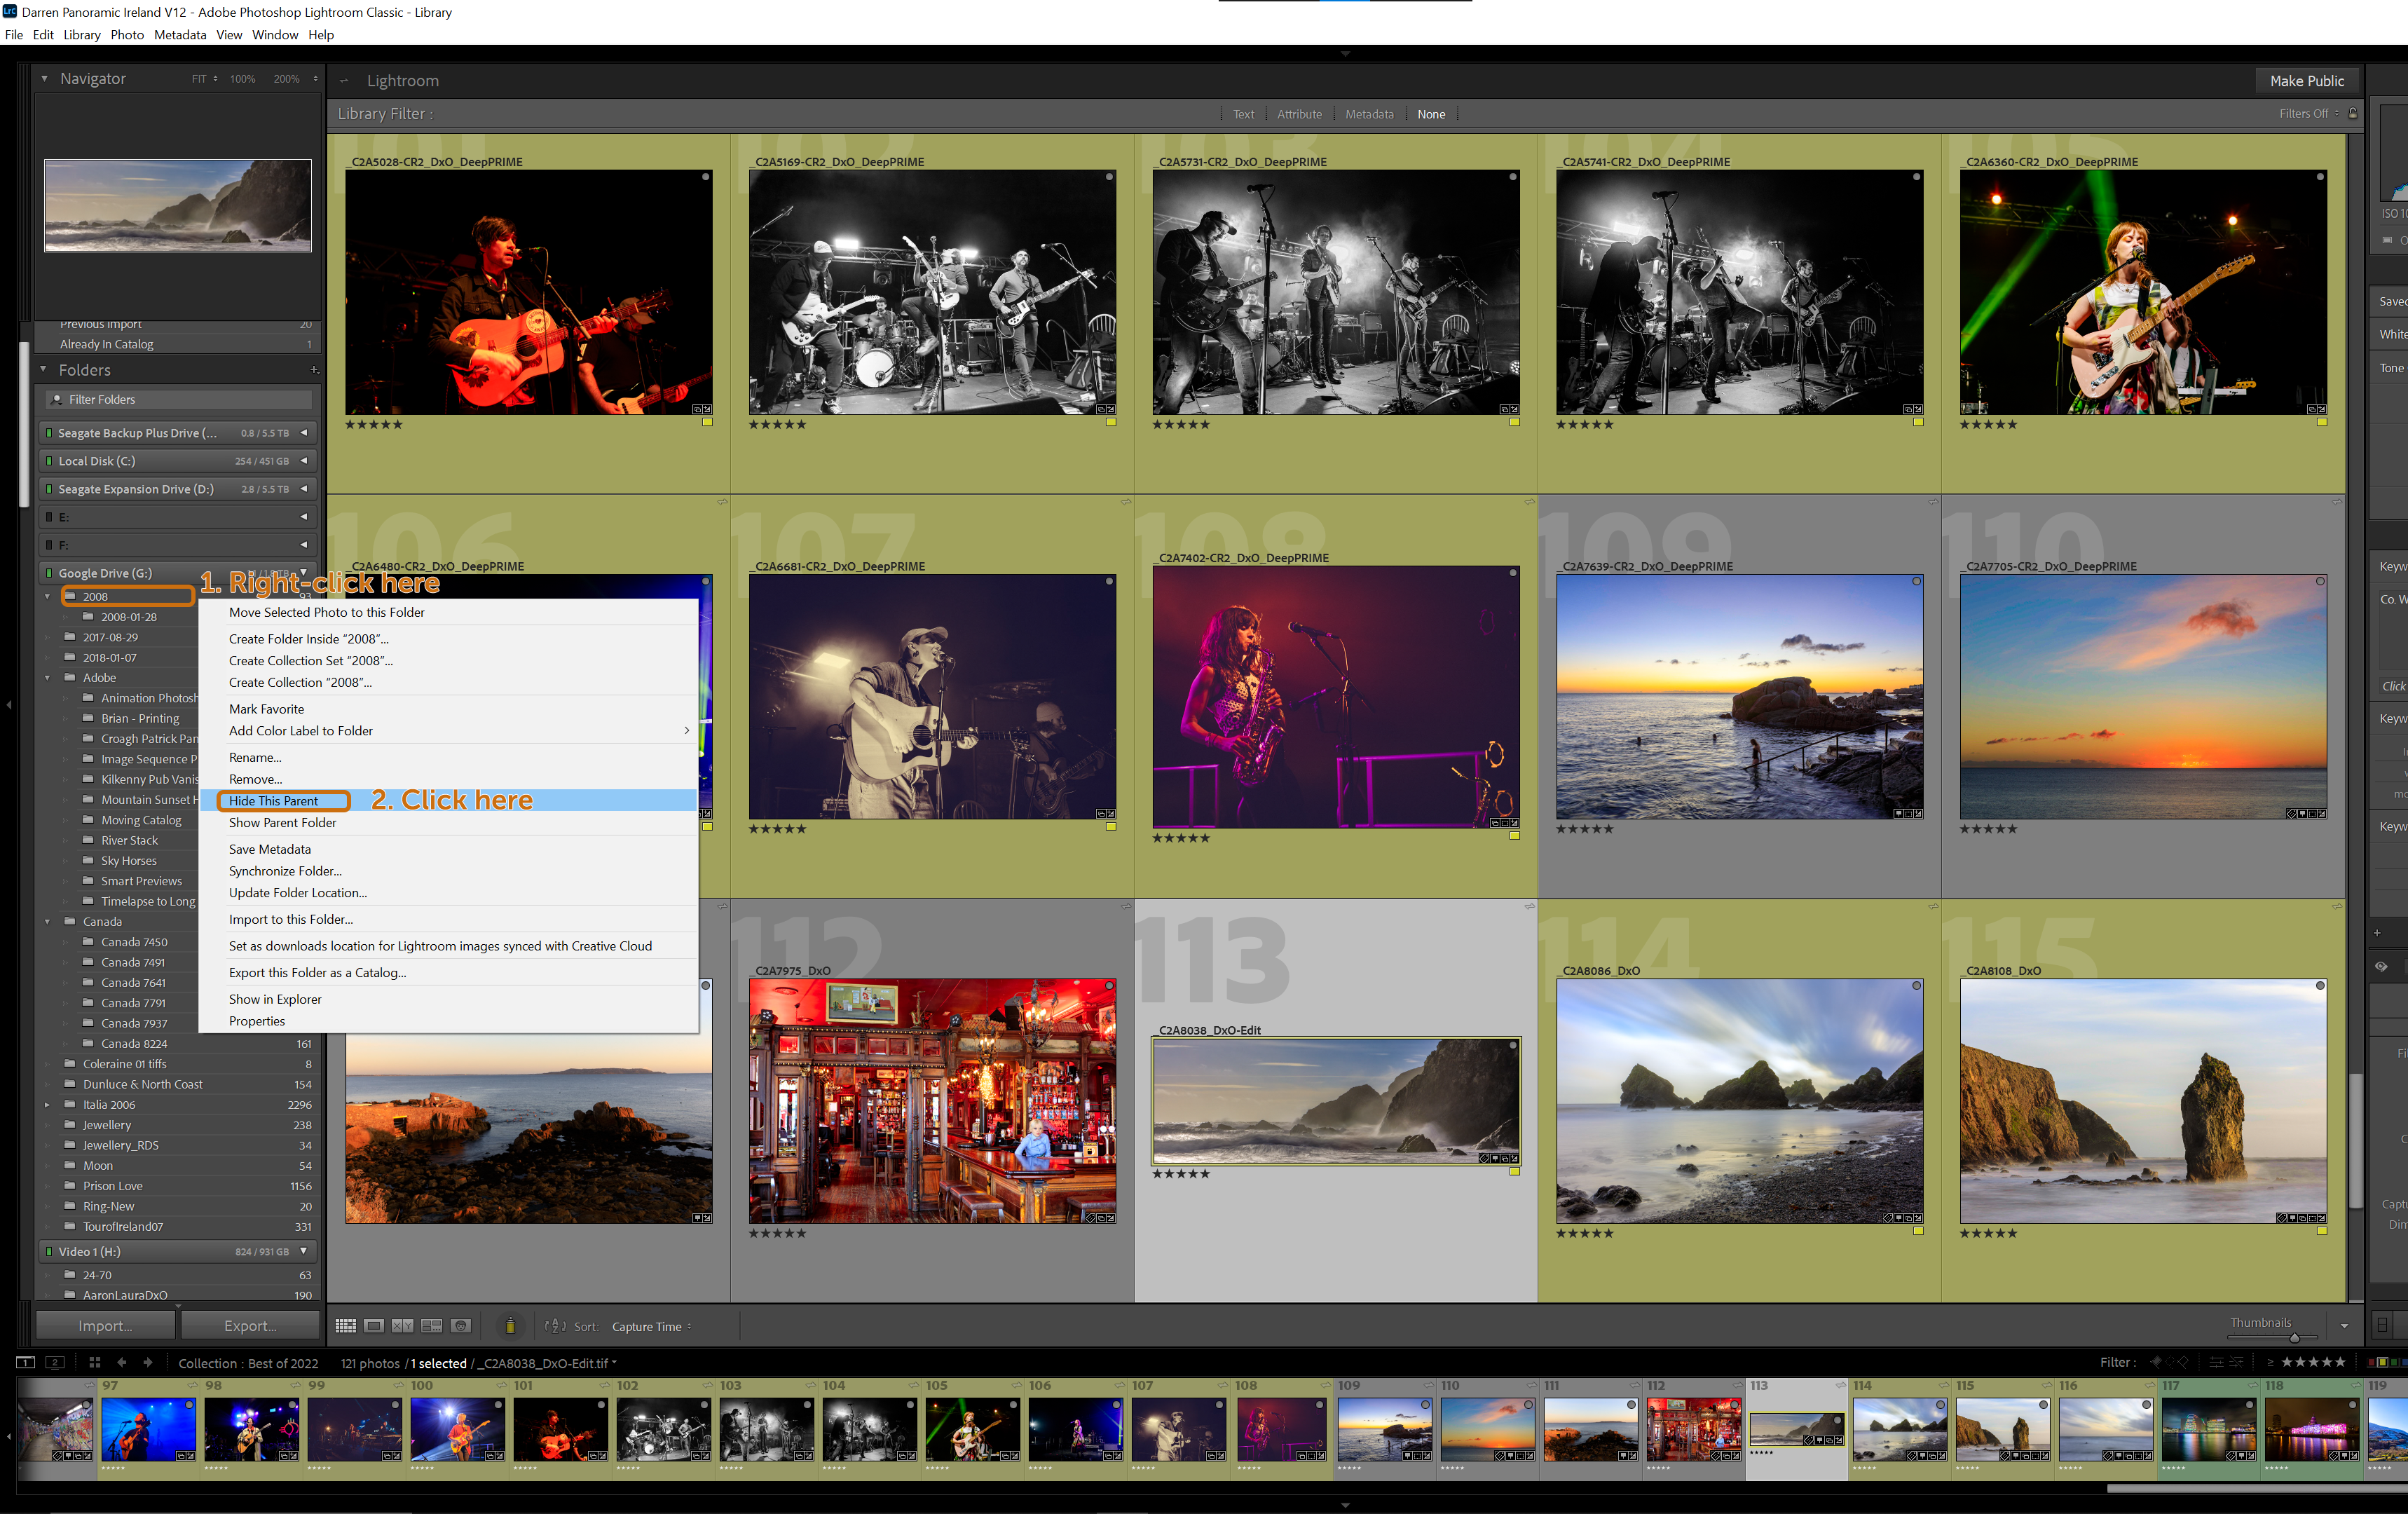
To remove the nested folder structure, just do this:

  1. Right-click on the parent folder [2008]

  2. In the context menu that appears, click on Hide This Parent

  3. That's it, the folder (and any others in the parent folder) will now be shown individually


{}


Adobe Lightroom Image Management - Hide Parent Folder


This way of manging images will work even if you have more than one level of nested folders, so here I could have a top level parent called Images which contains year-based folders each of which contains day or month based folders.

Using the methods above will allow you to show or hide the next level up every time, so my folder 2008-01-28 is contained inside a folder called 2008, now let's say that is contained inside a folder called Images then:

  1. Right-click on the current parent folder [2008]

  2. In the context menu that appears, click on Show Parent Folder

  3. That's it, the folder will now show as parent to both 2008-01-28 and 2008


Now your folder structure matches perfectly with your hard drive and now I know where to find my image of waves breaking on the Irish coast.

Join me in Ireland or online to learn how to photograph and how to manage your images - all year round.

Panoramic Ireland - Irish Coast - Seascape Photography